 |
||||||||||||||||||||||||||||||||||||||||||||||||||||||||||||||||||||
|
If you have trouble viewing this newsletter, click here. Welcome again to our monthly newsletter with features on exciting celestial events, product reviews, tips & tricks, and a monthly sky calendar. We hope you enjoy it!
“Say, what’s that bright orange star in the southeast late at night?” My wife asked me this the other day. I knew right away that she was talking about Mars, since, once it’s above the horizon, it’s about the brightest, most easily seen object in the sky. Only the Moon, Venus, Jupiter and the star Sirius are brighter. To read the entire article, click here to download the PDF [129 KB].
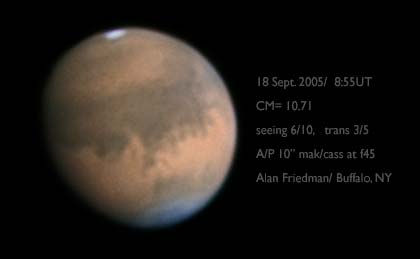
Secrets of Astrophotography It’s not as big as the full moon, or as close as it was in 2003 – but this fall will be the best opportunity for a good view of Mars until 2018. We are already beginning to see a replay of the Mars fever that greeted the 2003 historic close encounter between Earth and the red planet. Fabulous amateur images are appearing daily on the internet and the instrument of choice to capture images of Mars is the webcam.
A superb image of Mars captured by Alan Friedman, Sept. 18, 2005. What is it about this tiny plastic camera in crazy shapes (primarily intended for video teleconferencing) that makes it so well suited for high resolution views of the planets? If you’ve spent time looking through a telescope, you have the answer. At high powers, sharp images are fleeting – coming into and going out of focus, blurred by the movement of the air around us. The effect of the air’s interference with the image in the telescope is defined as “seeing”. Our eye/brain combination is surprisingly adept in turbulent air. It can glean details from an image that is only intermittently sharp. A camera is less forgiving – averaging an image over the duration of an exposure. For this reason, until very recent times the finest observations of the planets were visual. Sketches at the eyepiece recorded details that were blurred in photos through even the largest observatory telescopes. In the 1990s, planetary photographers put down film cameras and started to experiment with video. Attaching camcorders and sensitive security cameras to the focuser of their telescopes, they captured video footage of the planets in real time. Viewing the movie as individual frames, brief bursts of clear frames were recorded amongst those that were blurred by the atmosphere. Images of revolutionary quality were created using computer software to “stack” or average only the sharp frames. There were some drawbacks. The amount of hardware needed to capture video in the field – TV monitors, video capture cards, cables, power – was bulky. Also, video is analog and sacrificed information in the conversion to digital data on the computer. Webcams offered an excellent refinement of this technique (although their whimsical plastic cases are sometimes the epitome of computer geek fashion). They capture digital streams, ready for computer processing. They are tiny, light and (for the most part) inexpensive. They are a dream to set-up, drawing power and communicating with the host computer through a single USB cable. Armed with a laptop computer and a webcam, amateurs began taking the finest images of the Moon and planets ever captured from the Earth’s surface.
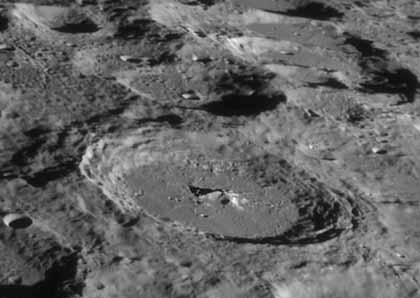
The moon crater Moretus captured by Alan Friedman. Under the stars One of the beautiful things about planetary imaging is that it can be done anywhere. You do not need a dark sky or a permanent observatory. Between the Moon, the Sun the planets and double stars, there is a target that will work from my urban back yard any clear night of the year. There are some telescope considerations. The planets are small and will need significant enlargement to show detail. Magnifying the image will also make it dimmer, just as it does in the eyepiece. To provide enough light for a good exposure, an aperture of 5” or larger is advisable, 8-14” probably ideal. The scope should have good optics, be well collimated and allowed to reach the ambient outdoor air temperature for best results. Many optical designs will work well. The first step is to become familiar with reading the night sky and recognizing conditions that are favorable for planetary imaging. Those crisp nights when the sky is transparent and the stars twinkle like diamonds are beautiful – but often offer poor seeing. The still and humid nights when the air is heavy will provide steadier air. Internet resources such as the Clear Sky Clock and weather sites that show the position of the jet stream can be helpful predictors of seeing conditions. When the image of a star at high powers dances in the eyepiece at high power, it might be a better night to catch up on sleep or to process old images rather than take new ones. When the forecast is good – you want to plan ahead so that your telescope is set-up and cooled down. Image your target as high in the sky as possible to minimize the atmospheric interference. Some sort of tracking mount is important (at high powers things move fast due to the Earth’s rotation) but perfect polar alignment is not necessary. I usually begin the session with a visual observation to gauge the seeing conditions and to just relax and enjoy the night sky before getting down to work. When ready, I center the planet visually in the field of view, remove the diagonal and insert my imaging set-up into the focuser. Depending on my target, this will consists of a barlow to increase the effective focal length (I usually work between f30 and f45) and a color filter wheel to allow me to capture images at different wavelengths with my B&W webcam. When these are in place, I insert an eyepiece to center and focus the image – then quickly remove it and insert the webcam. Usually the planet is visible on the chip and not too far from focus - a quick real-time adjustment for position and sharpness and I am ready to capture images. The adjustment of camera settings will require trial and error and will depend on your equipment. For color cameras you will work to achieve a balanced image that is bright enough without burning out the highlights. Color should be adjusted to appear natural on the screen. Frame rate (the speed at which the computer receives frames from the camera - measured in frames per second) must also be considered. Fast is good – you will capture more frames during those brief steady moments - but the rate can only be as fast as the shutter setting will allow. Fast frame rates (30 fps and faster) will fill up a hard drive in no time! I often capture 8 gigabytes in a session. Head spinning yet? Not to worry, experimentation and experience will guide you to the best settings for your equipment and software. The morning after There is a wide and growing range of capture and image processing software to choose from. Many are fine shareware titles developed by amateur astronomers. Each allows you to select and stack the sharpest frames from video streams as well as offering numerous image processing routines tuned specially for planetary images. I work on a Macintosh platform – excellent software exists here too. Image processing is a blend of art and science. The goal is to please the senses but at the same time render an image that is faithful to the data you have collected. Many interpretations and styles are represented. When the wealth of images is viewed and discussed collectively through resources such as ALPO (Association of Lunar and Planetary Observers), a deeper understanding of the subject results. Personally, I prefer a restrained touch on enhancements such as sharpening and contrast – it is easy to get enthusiastic and overdo it. Bitten by the bug? There are a number of fine websites and forums to explore this exciting subject in greater depth. I’ve listed a few below. The entry cost is low and the thrill of your first finished images will be priceless. Give it a shot! https://groups.yahoo.com/group/QCUIAG/ https://www.astromart.com/forums/ https://cleardarksky.com/csk/ https://www.calsky.com/cs.cgi https://www.spaceweather.com/ SAC CCD Imaging Camera MaxIM DL / CCD v.4.0 Alan Friedman
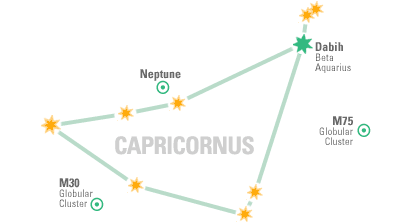
Dabih is an easy binocular double, hanging below Alpha Capricornus, an easy naked-eye double. The lower pair are separated by 20,000 lightyears but are actually part of the same gravitational system; a physical double. The alpha pair are an optical double, the brighter lying 109 lightyears from Earth and the dimmer lying a further 578 lightyears along the same line of sight. M75, while technically in Sagittarius, is a nice Mag 8 globular cluster. The horizontal bar of a cross asterism at 62 Sagittarii points the way. If you've never seen the gentle blue glow that emanates from Neptune, now is a great time to take a peek. Both Neptune and Uranus (currently in Aquarius) are fairly easy binocular targets but their subtle colors only show in telescopes. M30 (NGC 7099) is a large, dense globular cluster, roughly 26,000 light years distant. Sean O'Dwyer, Starry Night® Times Editor
|
September 2005
|
|||||||||||||||||||||||||||||||||||||||||||||||||||||||||||||||||||
|
Submit photos to SPACE.com for a chance to win a trip to Hawaii, a new Nokia 6682 and more! Sponsored by Nokia and Imaginova. Have you been taking pictures with your new digital camera? Your albums of science and space images could be your winning ticket to a trip to Hawaii. Nokia and SPACE.com are looking for your best astronomical and science photography. Submit your cool images to Amazing Images and, if your entry is voted one of the best, you can qualify to win amazing prizes. For a chance to win, go to: space.com/amazingimages/summerunderthestars/ GRAND PRIZE...
AND...
For more information on the other prizes or to submit photos, go to: space.com/amazingimages/summerunderthestars/ Don't forget to tell your friends. The more times (and more friends) who vote, the more chances you have to win!
|
||||||||||||||||||||||||||||||||||||||||||||||||||||||||||||||||||||
 |
||||||||||||||||||||||||||||||||||||||||||||||||||||||||||||||||||||
|
|
||||||||||||||||||||||||||||||||||||||||||||||||||||||||||||||||||||
You have received this e-mail as a trial user of Starry Night® Digital Download
or as a registrant at starrynight.com. To unsubscribe, click here.
