 |
||||||||||||||||||||||||||||||||||||||||||||||||||||||||||||||||||||||||||||||||||||||||||||
|
If you have trouble viewing this newsletter, click here. Welcome again to our monthly newsletter with features on exciting celestial events, product reviews, tips & tricks, and a monthly sky calendar. We hope you enjoy it!
A preliminary review
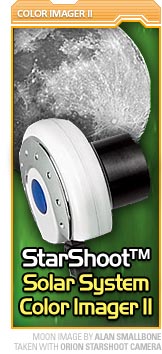
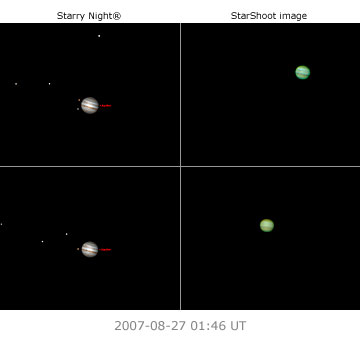
Equipment used My original laptop had only USB 1.1 ports, rather than the USB 2.0 port required for this camera. I purchased a USB 2.0 card for my laptop, but it proved incompatible with the highest resolution mode of the camera, so I had to borrow another laptop, an IBM ThinkPad 2373 with built in USB 2.0 ports, for this test. The telescope I used was my Celestron NexStar 6SE, a 150 mm f/10 Schmidt-Cassegrain with 1,500 mm focal length. This was used both at its primary focal plane and also with a Tele Vue Powermate 2.5x, yielding a focal length of 3,750 mm. The StarShoot™ Solar System Color Imager II is a very simple device. It has no controls on it, being entirely controlled by the supplied MaxIm DL Essentials software. It plugs into the telescope’s focuser just like a 1.25” eyepiece, and connects to the computer with a USB 2.0 cable plugged into the bottom of the camera. A bright blue light on the back of the camera indicates that it is powered up; this is handy, but the color is a little odd in an astronomical setting. The camera housing clearly indicates the orientation of the chip inside, an improvement over the original StarShoot. The main improvement over the original StarShoot is the much larger CMOS sensor, with its 1.3 million pixels in a 1280x1024 pixel array. Target: Jupiter My primary target so far has been the planet Jupiter. Unfortunately, it is extremely low in the sky this late in the season from my observing location at 45° north latitude, so my efforts have been hampered by the poor seeing at such a low altitude, 17 to 18° when my images were made. The poor seeing made it difficult to achieve a good focus, even viewing the enlarged image on the laptop’s screen. I made a number of exposures at slightly different focus settings, but all the images show a certain amount of blur which I attribute to the poor seeing. As Mars becomes larger in the next few months, I plan further tests with a target which will be much higher in the sky. The only other target I’ve attempted was a nearly Full Moon, 13 days old. This was also low in the sky, and waves of poor seeing are clearly visible on the images I made. Controlling the camera The StarShoot comes with its own software package: MaxIm DL Essentials. MaxIm DL, authored by Ottawa’s Doug George, is one of the most popular and powerful software packages to control cameras, capture images, and process the results. A simplified version, MaxIm DL Lite, comes as part of Starry Night®’s Astrophoto Suite. The version with the StarShoot camera is even more basic, though it performs all the functions a beginner needs. You can use it to capture images in several different ways. You can have it capture a single image, automatically stack a short series of images in a single image, capture multiple single or stacked images, or capture a long series of images as an AVI movie clip. I found this array of variations really confusing at first. In my first session I mainly captured AVI movies, but found myself overwhelmed by the sheer volume of data acquired in a short time. A 30-second clip at the StarShoot’s full resolution eats up more than a gigabyte of hard disk space! You’d better have a large hard drive to hold your image files. Also, the sheer number of images in a clip this size (450 frames at 15 frames per second) requires huge amounts of RAM to process. I have tons of data from that session, but it’s next to impossible to analyze. In my second session, I used a different capture mode. I set the camera to capture and combine five frames at a time, recommended because the seeing was poor, and to do this in batches of ten. This produced reasonably small data sets for me to practice my processing skills on. Each saved file was 7.6 megabytes in size, a batch of ten taking 76 megabytes. Once I figured them out, the camera controls worked fine, and I captured images with no problems. Processing the images This is where I had a lot of trouble. As mentioned MaxIm DL is powerful software, and what goes with that is a lot of complication and a very confusing interface. It’s taken me an extraordinarily long time to figure out how to perform even the most basic processing tasks with MaxIm DL Essentials. Part of the problem is Orion®’s manual, which oversimplifies and just plain ignores most of the processing functions of the software. The user interface is perhaps the most unfriendly I’ve ever used, and the way the windows operate doesn’t seem to conform to any interface standards I’m familiar with. Windows overlap each other without any apparent way of displaying the parts of the window hidden by the window in front. With a lot of trial and error, I managed to stack a number of the images I made. I then exported these to my Mac, where I did a bit of mild image processing. I’ll present them here, along with Starry Night® images from the same dates and times:
It should be noted that Starry Night® uses an image of Jupiter that is a few years old, and the South Equatorial Belt (South is at the top in these images) has faded very extensively this year. These images actually represent fairly faithfully the visual appearance of Jupiter on the nights they were made. As mentioned above, Jupiter’s low altitude has made fine detail extremely elusive this year from my location. Preliminary conclusions These images represent my very beginning steps in planetary imaging, and shouldn’t be taken as a negative report on the StarShoot Imager. It performed exactly as advertised, but the limitations of my experience and seeing conditions resulted in less than perfect images. I’ve just taken delivery of a larger telescope, and plan to spend a lot more time learning to use this hardware and software. As the images on Orion®’s web site indicate, it’s capable of much finer results. I’ll report back on my results in a few months time. Geoff Gaherty
My love affair with Starry Night® began many years ago when I was first playing with the program and discovered the magical command Go There. There are hundreds of places on Earth to which you can travel to view the sky using Starry Night®. By choosing Viewing Location under the Options menu, you can choose from a lengthy list. Most places have the same scenery (your default panorama) but some places are special and have their own panoramas, such as Firenze (inspiring), Detroit (depressing), and Stonehenge (mystical). [Note: Not all panoramas are available in every version of Starry Night®.]
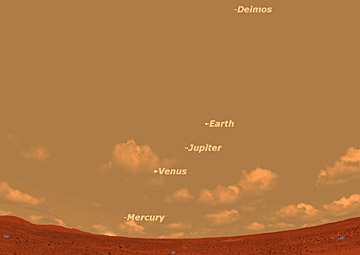
Venus rising over the Duomo in Firenze, 2007 September 15. Traveling to other planets With Starry Night®, you don’t have to limit yourself to the planet Earth! Point at any planet in the sky (or the Sun or Moon) and Starry Night® will take you there. If you right-click (in Windows) or control-click (on a Mac) you will see a pop-up menu, and one of the commands is Go There. Click on that, and soon you’ll be hovering above that object. Use the Viewing Location command to select a particular spot to visit, such as Gusev Crater on Mars or any of the Apollo landing sites on the Moon. If you’re impatient with the speed of travel, touch the space bar to be transported instantly.
Sunset over Gusev Crater, 2007 September 15. Once you’re on another planet, try changing the time so you can observe the changes overhead. Look for the moons of that planet (Jupiter and Saturn are particularly interesting) and zoom in on them to see their changing phases. Then use the Go There command again to travel to Io or Titan and observe the mother planet overhead. Try increasing the time flow rate to make things move along. Traveling to other stars Why stick to the Solar System, when you can travel to the stars? Here’s what to do. Turn on the constellation stick figures under the View menu:
Now select a nearby star, such as Alpha Centauri, Sirius, Procyon, or Altair, and, once again, use the Go There command. There won’t appear to be much change at first, since interstellar travel is a slow business. But soon you’ll be on your way, and hovering above another star. Because we don’t have images of other stars, the star itself will remain a point of light, but take a look at the stars around you. Do they look a bit different? Familiar constellations will look a bit warped, because we’re viewing the stars in them from a different location, and seeing the three-dimensional array of stars from a slightly different perspective. In particular look for our Sun, and see how it forms part of a constellation as seen from another star.
The winter constellations as seen from Alpha Centauri. Notice how Orion, whose stars are quite distant, is relatively unchanged, while nearby stars are in very different locations, Sirius right next to Betelgeuse and Procyon moved to Gemini. The Sun is a first magnitude star in the constellation Cassiopeia (not visible here). Geoff Gaherty
After announcing the StarShoot "Planet, Moon, Sun" Photo Contest this summer, we received a number of awesome images from our contestants. The judges have made their decisions (although it wasn't easy) and the winners are: 1st Prize: Chuck Pavlick, Cape Coral, FL
Chuck has been observing for over 40 years, religiously for the past 7. His favorite astrophoto subject is Jupiter, because there's always something interesting happening on the surface, or with the moons and their shadows. Back in the 70's, Chuck started photographing the Moon. But when digital cameras came out, his interest really took off! Chuck's advice to aspiring astrophotographers is, "It takes a lot of patience, but it is very rewarding". Chuck's winning photo was captured with a friend's 20-inch Dobsonian, taken from his backyard in the city. On that particular night, the seeing conditions were average. It took roughly 30 minutes to focus, set up and shoot about 300 exposures.
Howard has been an occasional observer since the mid-1960's, but more regularly since 2003. He likes to split his primary observations between the Sun and Moon, and he is a member of the American Lunar Society. From the first time he saw a photo of the stars in grade school, Howard knew it was something he wanted to do. Howard loves collecting daily observation records of the Sun and Moon, and feels a strong link to ancient astronomers such as Galileo, William Herschel and Richard Carrington. He also believes our sister planet, the Moon, is rich with history and can tell us much about where we came from. Howard's advice is: "Just do it! Look to the details of those you admire and learn as you go". Howard's shot of the Moon was taken during early morning hours, with a 6-inch refractor on a wheeled dolly, which allows him easy access between his garage and driveway. It only took about an hour to capture the winning photo. "Seeing conditions were wonderful" said Howard.
Greg has been an active observer for 12 years. His favorite planetary subjects are Saturn and Jupiter. Greg became interested in astrophotography as recent advances in technology made it possible for backyard astronomers to capture detailed images. What excites him most is being able to photograph an object for the first time, and observe more detail and color than he could see with his own eyes. Greg offers fellow astro-imagers the following advice: "Go for it, it's not as hard as you might think, the cameras are user friendly". Greg has always loved Jupiter and says he couldn't have asked for a better night. In fact, he says conditions were "almost perfect". Greg's winning Jupiter photo was captured with an Orion® SkyView Pro 127 Maksutov-Cassegrain on a GoTo mount, with a total 2.75 hour exposure. Honorable Mentions We would also like to acknowledge several other astro-imagers who captured excellent images of our solar system. Each will receive a $25 Orion® Gift Certificate: • Mike Flores, Denton, TX (Mercury transit and sun spot) Congratulations to all our winners! You too can take stunning astrophotos of the planets and beyond. To fast track your journey into the exciting world of astrophotography, order one of our StarShoot cameras today!
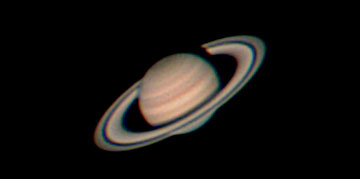
At this time of the year, as seen from mid-northern latitudes, Aquarius glides low above the southern horizon, between Capricorn to its West and Cetus to its East. The Saturn Nebula (NGC 7009) is an oval Mag 8 fuzzy patch hanging in space about 4,000 lightyears distant. Medium-sized scopes show a ring with "knobs" on either side. M72, close by, is a small remote globular cluster, difficult to resolve. The open cluster M73 is a tiny triangular collection of stars, barely noticeable. However, the same field of view contains a lovely Lyra-like asterism. The Mag 7 globular cluster M2 is about 40,000 lightyears away. Although among the brightest of globs in the sky, M2's core is so concentrated that, as an observational object, it ranks as one of the less compelling. The Helix Nebula (C63/NGC 7293) is a tricky target. Although it is the largest visible planetary in the night sky (about half the apparent diameter of the full moon) it's quite dim. Dark skies are a must. A low-power eyepiece in your telescope, with averted vision, may give you some hint of structure. Finally, at 103 lightyears distant is one of the sky's finest doubles, Zeta Aquarius. Sean O'Dwyer
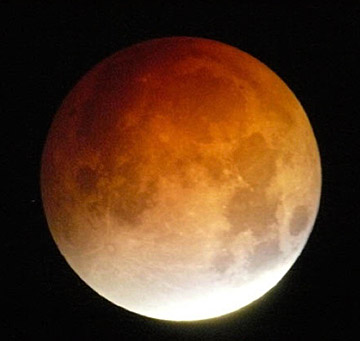
Total Lunar Eclipse
PRIZES AND RULES: We would like to invite all Starry Night® users to send their quality astronomy photographs to be considered for use in our monthly newsletter.
Please read the following guidelines and see the submission e-mail address below.
|
OCT. 2007
|
|||||||||||||||||||||||||||||||||||||||||||||||||||||||||||||||||||||||||||||||||||||||||||
 |
||||||||||||||||||||||||||||||||||||||||||||||||||||||||||||||||||||||||||||||||||||||||||||
|
|
||||||||||||||||||||||||||||||||||||||||||||||||||||||||||||||||||||||||||||||||||||||||||||


 2nd Prize: Howard Eskildsen, Ocala, FL
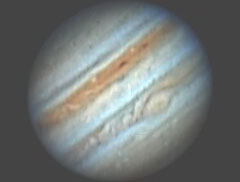 3rd Prize: Greg Ruhl, New Paris, OH
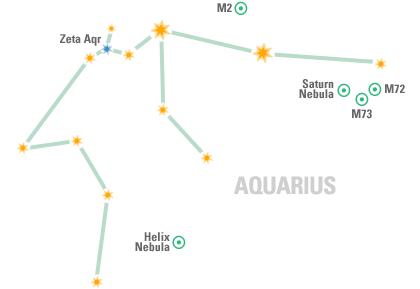


You have received this e-mail as a trial user of Starry Night® Digital Download
or as a registrant at starrynight.com. To unsubscribe, click here.