 |
||||||||||||||||||||||||||||||||||||||||||||||||||||||||||||||||||||||||||||||||||||||||||||||||||||||||||||||||||||||||||||||||||||||||||||||||||
|
If you have trouble viewing this newsletter, click here. Welcome again to our monthly educational newsletter with features on exciting celestial events, product reviews, tips & tricks, and a monthly sky calendar. We hope you enjoy it!
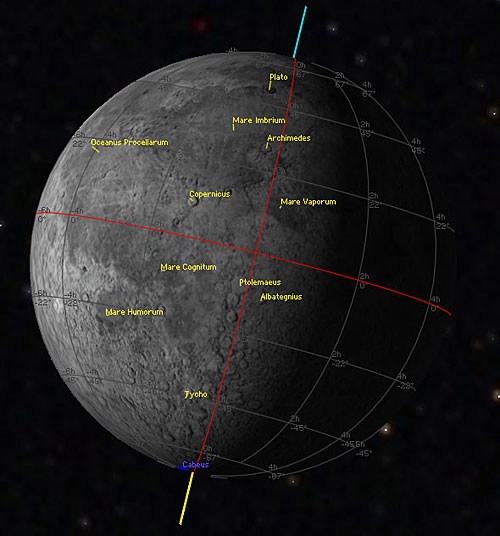
LCROSS is NASA's Lunar CRater Observation and Sensing Satellite. Its mission is to determine whether water ice exists in the lunar soil in craters near the Moon's south pole, which it will do by crashing into the surface and producing a plume of lunar surface material. Research telescopes on Earth will be watching to analyze the content of the plume. LCROSS was launched on July 18, 2009 along with the Lunar Reconnaissance Orbiter, a satellite that has been taking high-resolution pictures of the lunar surface. Why is the Moon's south pole so important? Remember that a day on the Moon—the time it takes the Moon to rotate once, or the time between two sunrises on the Moon—is as long as a month on Earth. Most parts of the Moon's surface get a couple of weeks of sunlight followed by a couple of weeks of darkness. Ice just can't form on most of the Moon's surface, because of the long, intense periods of unfiltered sunlight that would vaporize it. Because the Moon has very little tilt with respect to the Sun, it doesn't have seasons the way the Earth does. If you could stand at one of the Moon's poles, the Sun would skim along the horizon, never rising more than a few degrees. If you were standing in a crater at one of the poles, you would never see any light at all, just like the bottom of a well only gets sunlight when the Sun is high overhead. Open this file in Starry Night to see how the Sun almost never rises when you're standing at the Moon's south pole. Try skipping time ahead one month at a time. The landscape is made translucent so that you can see the Sun behind it. Pay special attention to the line white line marked "Horizon Line" (the true horizon, 90 degrees from the zenith) and the green line marked "Ecliptic" (the path of the Sun in the sky). It's estimated that about 12,500 square kilometres (almost 5,000 square miles) of the Moon's surface is permanently shadowed like this. These are the only places on the Moon where ice could exist, so that's where LCROSS is going to look. The crater chosen as the impact site is called Cabeus. The Cabeus crater complex can be seen on the map below, marked in blue. This is what the Moon will look like on October 9.
When will LCROSS impact on the Moon's surface? The impact is scheduled for October 9, 2009, at approximately 04:30 am PDT (07:30 am EDT, or 12:30 pm UTC). The LCROSS probe will detach from the upper stage of the rocket that was used to launch it, and the rocket stage will impact on the surface first. LCROSS will observe the impact and the plume and send signals back to Earth just before it crashes into the surface itself. Can I view LCROSS on its way to the Moon, or can I watch the impact? Yes, you can! To observe it directly you will need at least a medium- to large-sized amateur telescope, and a CCD camera. You can use NASA's HORIZONS system to generate ephemerides (tables that tell you the celestial coordinates of an object over a period of time) of its position on its way to the Moon: For more information on photographing LCROSS, here's a page geared towards amateur astronomers Some astronomy clubs, science centers, and planetariums near you might be having LCROSS impact parties, so check your favorite facilities for events. NASA's own official impact party at Moffett Field, California will be open to the public Finally, if you can't get to any of these events and don't have the equipment, you can always watch coverage of the events on NASA TV. You'll see the images and hear about the results as soon as they're available. You can watch NASA TV on the internet at www.nasa.gov or check to see if your digital cable or satellite TV service carries it. Brenda Shaw
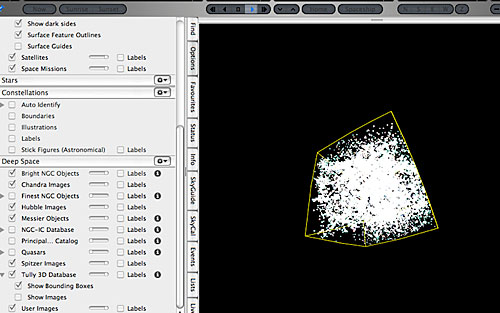
The Deep Space database in Starry Night contains the Tully 3-D database of about 28,000 nearby galaxies that cover 700 million light years of space. The positions of these galaxies are plotted in three dimensions so you can use Starry Night’s controls to navigate the structure of the nearby universe. To get started, elevate from Earth until you are about 1 billion light years away. Click on the Options side tab and open the Deep Space and Tully Database choices.
Now decrease the elevation until you are about 100 million light years from Earth. Note that the galaxies are not distributed evenly throughout space. They tend to clump together in groups (clusters) and stretch along long lines or filaments. Pointing to a galaxy and right-clicking (Ctrl-click on the Mac) will allow you to highlight a group or filament of galaxies.
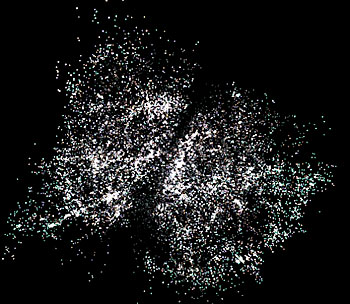
You can then use the location scroller (press and hold the SHIFT key while dragging the mouse) to view the group from different directions. Setting the time flow rate to about 500x and running time forward gives a nice animated view of the galactic neighborhood’s structure. As with most entries, you can customize the appearance and labels of the database by placing your cursor over the Tully 3-D Database entry in the Options panel and then clicking to open the drop-down window. Here is a challenge: viewed from the correct angle and distance, the Tully database of galaxies resembles a butterfly...
See if you can find it. What do you think causes this appearance? Herb Koller
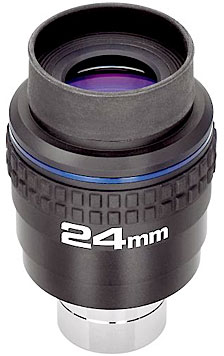
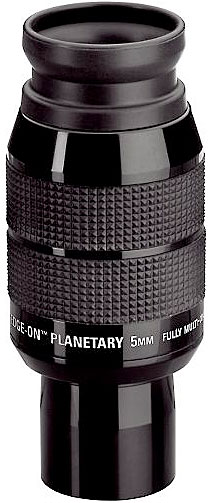
I recently received two of Orion’s eyepieces for testing purposes: a Stratus 24mm and an Edge-On Planetary 5mm. These are two of my most used focal length eyepieces, so serve as a good test for their respective series. Stratus 24mm
The Stratus series is unusual in being usable in both 2” and 1.25” focusers. There is a normal 1.25” barrel, but the lower part of the main body of the eyepiece is 2” in diameter, and so fits perfectly in 2” focusers. Since the Stratus series covers a wide range of focal lengths, it means that you can switch eyepieces in any telescope without fiddling around with adapter rings. Stratus eyepieces are available in 24mm, 21mm, 17mm, 13mm, 8mm, 5mm, and 3.5mm focal lengths. All offer a 68° field of view and 20mm eye relief, with the exception of the 24mm which has only 15mm eye relief. The eyepieces are finished in a matte black, with knurled rubber grips. The 24mm is a particularly useful focal length because it offers just about the widest actual field of view possible in a 1.25” eyepiece, delivered at a high magnification so that contrast with the background sky is maximized. For many years I have used a Meade Super Wide 24.5mm eyepiece to fulfill this function, so naturally that was the main eyepiece I compared the Stratus with. The telescope used for these tests was a Starmaster 11” f/4.3 Newtonian equipped with a Tele Vue Paracorr coma corrector. This lengthens the focal length by 15% but corrects all aberrations, delivering an aberration-free f/4.9 image. This is an “acid test” for eyepieces, as most are not designed to function well at focal ratios as short as f/5. If an eyepiece does well at f/5, it will be excellent in just about any telescope. My main test for eyepieces is to examine a critical image at both the center of the field of view and at the very edge of the field of view. Both images should be identical; I look particular for a variety of aberrations: chromatic, spherical, defects in contrast, etc. The Stratus 24mm passed all of these tests with flying colors. It was noticeably better than the Meade eyepiece at the edge of the field, where the Meade lost color and contrast. It’s worth noting that the Meade eyepiece, now discontinued, cost twice as much as the Stratus does. In the 11” Starmaster, the 24mm yielded a pleasing 58x: powerful enough to show detail in galaxies but with an actual field of 1° 11’, putting the objects in context. As I said, this is one of the most useful combinations of focal length and field of view. If the rest of the Stratus series is comparable to the 24mm, this makes an excellent choice for a high-quality eyepiece with a wide field of view. It used to be that using a 5mm eyepiece for planetary observation was literally a pain. Classic designs like the orthoscopic and Plössl had an eye relief so short that the observer needed to cram their eye into the eyepiece to even begin to see its rather narrow field of view. About ten years ago a series of new designs incorporating Barlow elements changed all this, allowing comfortable eye relief so that anyone, even with glasses, could observe in a relaxed manner. Orion’s new 5mm design represents the next generation of these comfortable short-focus eyepieces. Like the latest designs of ED refractors, it has a classy high-tech look with a gleaming black anodized finish. As expected, it delivers a bright, high contrast image, which can be viewed in total comfort thanks to its 20mm eye relief and large eye lens. It has a moderate 55° field of view, larger and far better corrected than any Plössl. This series of eyepieces is available in 14.5mm, 12.5mm, 9mm, 6mm, 5mm, and 3mm focal lengths. I tested it in my 11” Starmaster the same way I tested the 24mm Stratus. Once again, the image was identical whether in the center or at the edge of the field of view. This eyepiece produced 276x magnification, which proved to be the perfect magnification for Jupiter. It passed one of the best subjective tests of an eyepiece: within seconds I’d forgotten it was even there, and was totally absorbed in the detail visible in Jupiter’s atmosphere. Once it was in the focuser, I really didn’t want to take it out…ever! These two series of eyepieces are representative of what is now possible with computer-designed eyepieces manufactured with care. They outperform even the most expensive eyepieces of a decade ago and yet sell for prices a fraction of the so-called premium brands. Truly, we have never had it so good! Geoff Gaherty
When I worked as a computer consultant, my specialty was importing and exporting data. I once had a job trying to export data from an early Macintosh database. The authors of the program had decided that their software was so good that no one would ever want another program, and so had cleverly designed their software so that data, once entered, could never be exported. Despite my knowledge of all the tricks of the trade, I couldn’t figure a way to export the data. The situation made me really aware of the importance of software being able to talk to other software, clearly and unambiguously, and that has always been one of the reasons I like Starry Night. Printing Charts The most obvious way of exporting information from Starry Night is printing star charts for use under the sky or at the telescope. There are two main ways of printing charts: 1 pane and 3 pane. 1 pane charts are traditional charts, which can be set up to any scale using Starry Night’s zoom capabilities, including a special 180° chart of the whole sky. 3 pane charts allow you to show the sky at three different scales, so that you can depict naked eye, binocular, and telescope views on a single page. Starry Night gives you a series of 11 standard chart designs, or you can print custom charts using whatever display features you choose to turn on. All of these charts are negatives of what you see on the screen: black stars and labels on a white background, which is what most experienced observer’s prefer. Exporting Images Sometimes you want a more naturalistic depiction of the night sky. In this case, use the “Export as Image…” command under the File menu. This allows you to export the screen display in 11 different formats, including the best known graphical exchange formats and formats specific to many different graphics programs. The Options button lets you control the resolution and image size. QuickTime You can make QuickTime movies of anything displayed and animated on your Starry Night screen. You can even export the sky in QuickTime VR format, so that anyone with QuickTime can examine details of the sky by panning and zooming. Logs Experienced observers who use Starry Night will know about its logging features, which enable you to record your observations as part of Starry Night log files. While individual logs can be exported as text files, you can also use the “Export All Logs…” command to export all your log entries at once—an excellent way to prepare an observing blog, for example. This article has just touched on a selection of the export facilities built into Starry Night. As with many features, I encourage you to explore and experiment this rich learning environment. Geoff Gaherty
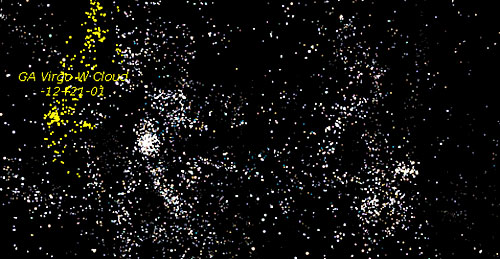
The Tully Database: Virgo Cluster This giant cluster of galaxies is the nearest large cluster at about 60 million light years. See if you can spot our galaxy, the Milky Way. Pedro Braganca
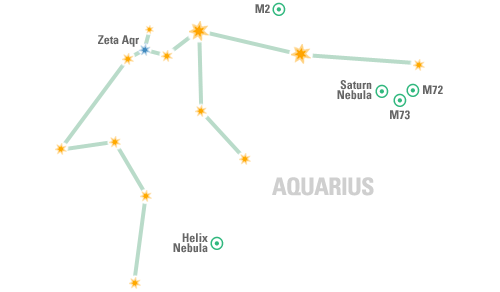
At this time of the year, as seen from mid-northern latitudes, Aquarius glides low above the southern horizon, between Capricorn to its West and Cetus to its East. The Saturn Nebula (NGC 7009) is an oval Mag 8 fuzzy patch hanging in space about 4,000 lightyears distant. Medium-sized scopes show a ring with "knobs" on either side. M72, close by, is a small remote globular cluster, difficult to resolve. The open cluster M73 is a tiny triangular collection of stars, barely noticeable. However, the same field of view contains a lovely Lyra-like asterism. The Mag 7 globular cluster M2 is about 40,000 lightyears away. Although among the brightest of globs in the sky, M2's core is so concentrated that, as an observational object, it ranks as one of the less compelling. The Helix Nebula (C63/NGC 7293) is a tricky target. Although it is the largest visible planetary in the night sky (about half the apparent diameter of the full moon) it's quite dim. Dark skies are a must. A low-power eyepiece in your telescope, with averted vision, may give you some hint of structure. Finally, at 103 lightyears distant is one of the sky's finest doubles, Zeta Aquarius. Sean O'Dwyer
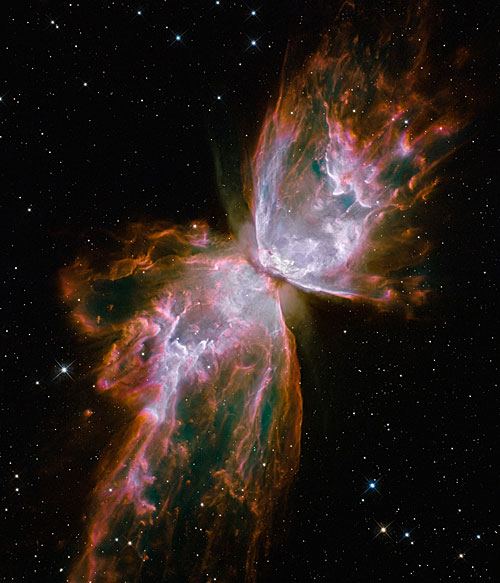
Butterfly Emerges from Stellar Demise in Planetary Nebula NGC 6302. Photo © NASA.
RULES: We would like to invite all Starry Night® Education users to send their quality astronomy photographs to be considered for use in our monthly newsletter. Please read the following guidelines and see the submission e-mail address below.
|
OCT 2009
|
|||||||||||||||||||||||||||||||||||||||||||||||||||||||||||||||||||||||||||||||||||||||||||||||||||||||||||||||||||||||||||||||||||||||||||||||||
 |
||||||||||||||||||||||||||||||||||||||||||||||||||||||||||||||||||||||||||||||||||||||||||||||||||||||||||||||||||||||||||||||||||||||||||||||||||
|
|
||||||||||||||||||||||||||||||||||||||||||||||||||||||||||||||||||||||||||||||||||||||||||||||||||||||||||||||||||||||||||||||||||||||||||||||||||
You have received this e-mail as a user of Starry Night® or as a registrant at starrynighteducation.com
To unsubscribe, click here.
